Optimize Images for Web Marketing.
If you optimize images for web marketing, you’re better positioned to showcase your products and services, and this means sales. Your marketing images are one of the first things people will notice about your company, product, or service. Hopefully, you’re starting with a really great image that speaks to your target market in a visual language that they understand. Now you want to put that image to good use! Uploading it at the right size and compression will ensure that it’s not pixelated and ugly when displayed on the web, and the right sized image will also speed up your website.
If you’re like most people, you’ve probably wondered, “How do I make this image smaller without destroying it!?” For years I used Microsoft Office Picture Manager to quickly compress images to “Web” or “Document” size in order to email them or place them in an email marketing piece, or upload them to my Web site. That seemed to work pretty well, but then I wanted more control, and dug deeper into Adobe Lightroom and Photoshop to get the results I wanted. However, for most people, Adobe photo programs are overkill and come with a steep learning curve. Today I’ll walk you through how to optimize images for web marketing.
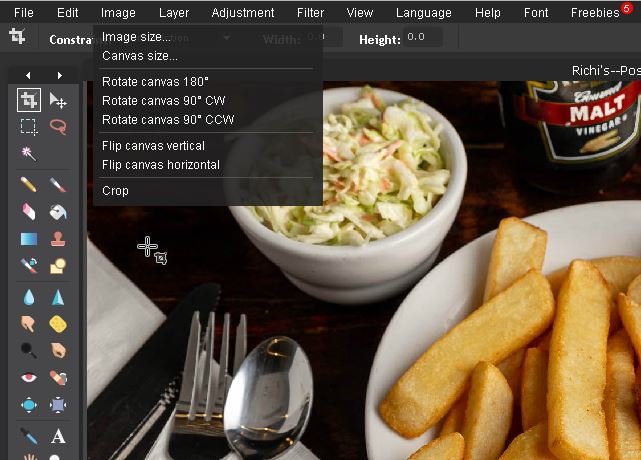
To optimize images for web marketing, they need to be sized and compressed optimally to show your product or service in the best possible light, and the right sized image will also ensure that your website isn’t loading slowly. If you don’t have access to more advanced tools, a good and free web-based solution is PIXLR. To resize an image with PIXLR: first, upload an image or point PIXLR to the URL of the image you want to resize. Next, click the IMAGE menu drop-down and select “IMAGE SIZE”. Select your desired image dimensions, and hit OK. Finally, in the FILE menu, select SAVE. Play with the Quality slider and watch below for your target save size. Adjust to taste and hit OK. Save your file, and you’re done!
What Size Image Do You Need?
While you could use PIXLR or any other image editing program to just crunch that image down, one size does not necessarily fit all when it comes to images. To optimize images for web marketing, how you intend to use the image is terribly important. If you intend to use the image on a Web site or blog post, it pays to know what size the image “should” be. Many times, if you’re uploading an image to a social media platform, they’ll advise what the suggested image size should be. It might be 1000 pixels by 1000 pixels or an overall maximum upload size of 1 megabyte. Make a note of this.
If you’re planning to upload an image to your Web site, or use in an email marketing piece, you should seek to get the best image quality and smallest size for the intended space the image needs to fill. Web sites can get bogged down right quick if you’re uploading images that are too large. This will potentially also result in your getting dinged by Google for a slow Web site, and they won’t direct users there. Not good for your SEO strategy, right? So, unless you’re featuring large, high quality images for a reason (a photographer?), you should make those images less than 100kb, if possible. The same thing is true for email marketing pieces. If your images are too large, they can automatically be rejected by the incoming server. Not good! Regardless, you’d be surprise how good an image can look on the Web if it’s sized correctly for the space it’s in.
If you want to use best practices for Web sites and email templates, you might want to use the “Inspect Element” function of your browser to find the optimum image dimensions. For example, if you’re creating a blog post, and you want the image and text to be responsive, upload the largest size image you’ll need, and let your system dynamically serve images based on your user’s device. A good practice is look at a blog that features an image that is the perfect size for what you want to do. Look at it on your desktop Web browser as well as your cell phone. Look great on all of them? Perfect. Just right click the image on your desktop browser and select “Inspect” or “Inspect Element,” depending on your browser. This will open up the development console, where you’ll be able to see the dimensions of the photo. Note that, and you can make your image this exact size using the directions to follow.


Resizing and Saving in PIXLR
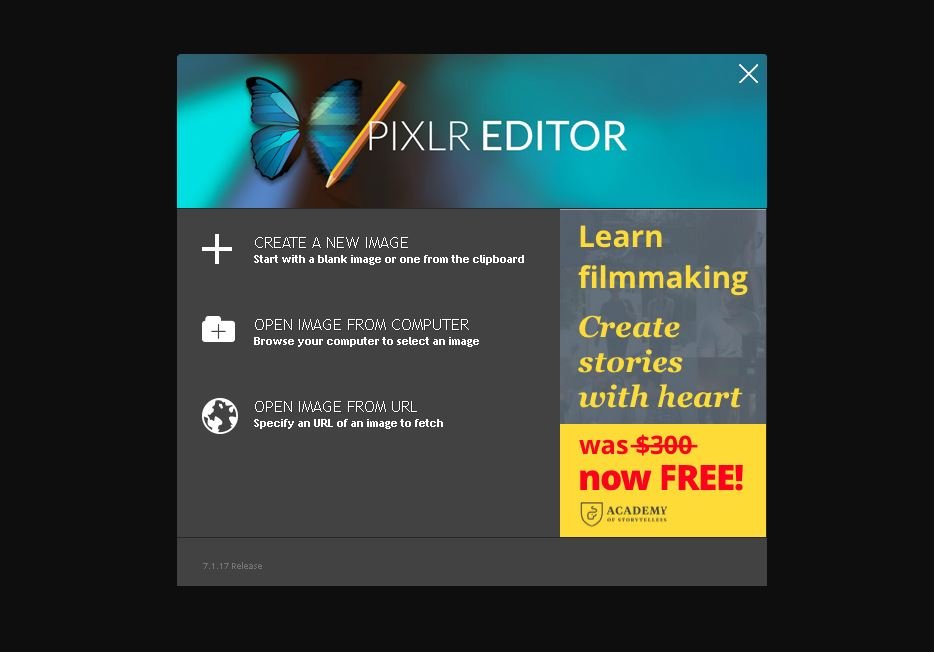
First navigate to PIXLR.com and select “OPEN PIXLR EDITOR”. It should be the first thing you see. This will open a new window, and you should have three options:

You’ll probably choose to either Open an image, or point to a URL for an image you found online (is that a copyrighted image? Just checkin’!) Navigate to the image you want to open, and it should pop right up. Next, if you’ve got pre-determined pixel dimensions, you’ll want to grab those and have them handy. For general Web use, and if you don’t have specific dimensions, you might suggest something less than 1000 pixels on the longest edge. Now let’s open up the RESIZE function.

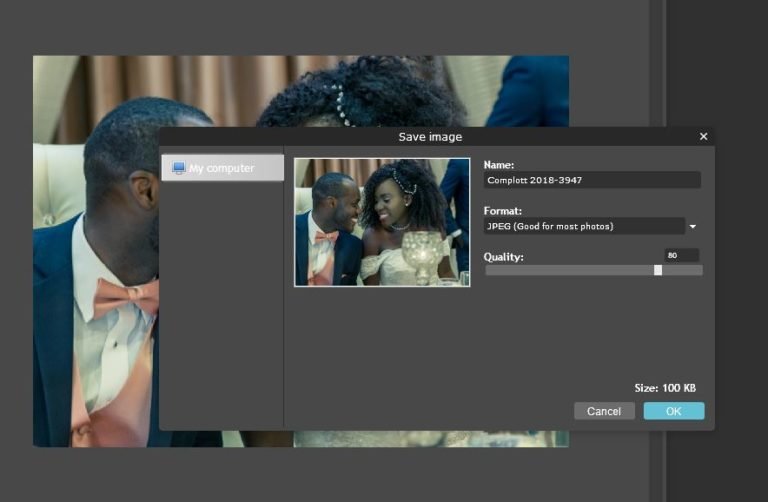
Now that you’ve resized the image to the using the longest edge, it’s time to save that image in a size that works for you. As you can see from my image, if I allow the program to use it’s default slider quality (80%), I’ll get an image that is only 100kb. This is perfect for the Web, and even if used full screen on a desktop, it’ll likely still look really good. Feel free to play with the slider function and try a few different sizes and see how they turn out. Sometimes, experimentation is key, and you’ll quickly get a feel for what sized images work best for your application.

When you optimize images for web marketing, you’re engaged in best practices. Nobody wants to see images that are blurry, pixelated, and have color banding, especially when it’s used to market a product or service. Hopefully this helps you get the image quality and size you need for all your marketing projects. If you have any further questions about image manipulation, just let us know! If you have questions about getting good marketing photography in the first place, you can fine that information here: Marketing Photography.

